

The best way of getting knowledge in digital marketing is to start your own blog. Once you start a blog, you have to purchase a domain, hosting and then you have to choose a blogging platform. Once finalized, now start to create your first blog website. So, here I shall show you how to create your own website, and once you follow the below steps you will have your own website running in 45 mins.
For my website I have used WordPress as the blogging platform or CMS.
Now, the question comes, What is CMS? The answer is below,
A content management system, often abbreviated to CMS, is a software that allows you to build, manage, and update your website content all in one place.
WordPress.org is the number one choice for the best CMS platform. It’s the world’s most popular CMS software, and it powers around 35% of all websites on the internet.
It’s important to not confuse WordPress.org with WordPress.com. WordPress.org is a free open source CMS originally designed for blogging, but now it’s used by all sorts of websites / online stores.
There are mainly 3 major steps to build a website. That’s it!! Its as simple as that.
Step1: Selecting and Registering domain name
Step2: Selecting and registering for a hosting plan
Step3: Installing blogging platform (WordPress)
You can also check out the below related articles,
How to improve website security
How to add a Privacy policy in WordPress website
Domain name selection to create your own website
The first and the foremost part of building a website with WordPress is to choose your domain name.
For e.g. shoutway.com
What I recommend is to go with a .com extension as this is the most preferred one. People prefers to search for a domain name with .com extension. If you are planning for a product / niche which is India centric, then better to go with .in extension.
However, if you are planning for out of India also, then best is .com.

Sometimes, people start websites with .in, .org or .net etc. But the issue comes when the website gains a lot of traffic, and people while searching for the website by default types with a .com extension, which siphons traffic from the original website to the site with .com extension.
So, before registering your domain name, check out that the same name is not used with some other extension.
However, exceptions are always there.
There are many big sites with millions of traffic which have a different extension, such as wordpress.org.
How to select a domain name?
A domain name should not be too long which may become slightly difficult for people to remember or type.
This is a good practice to keep the domain name not more than 10 to 13 words. If you are a beginner try to choose a simple and easy one. You can also include a word in the domain name which reflects your niche (that may be a keyword from your niche).
It is also good to have two simple words in your domain. For example digitaldeepak.com, its easy to understand that the site is maintained by a person (or a small group of people) who is involved with digital marketing field.
Avoid using double letters, hyphens any special characters in domain name as people may miss the word while typing.
Don’t get too stressed, if you are getting confused in selecting a name, if you are not getting any ideas, just use your name as the domain name.
The only drawback for this type of domain name is that, if you want to sell the site then there will be much less bid as your name is involved in the domain.
Again, there are number of exceptions, for example neilpatel.com
There are many domain name generator sites, such as
Namemesh, or
which will give you a number of options about your domain once you type your niche or subject.
I have used namemesh.com to get ideas. Just type your niche/subject or preferred word in the box and hit the generate button, namemesh will show a list of options of domain names. This is a very good technique to get name ideas.

Namemesh domain name generator

Domain name options in namemesh
Now as you finalize your domain name, act quickly before some one takes it. So, in step 2 below I shall show you the steps about how to register a domain.
Domain name registration
Every day thousands of domains get registered throughout the world. Good domain names are like real estates, if you don’t act fast someone else will get that.
Nowadays buying domain names are relatively cheap, so once you find a good name just grab it. There are lot of domain register sites in the web for e.g. bluehost, godaddy, namecheap etc.
For my shoutway.com website I have registered the domain from Godaddy.com
Here, I shall show you the steps for registering a domain in GoDaddy.
Firstly, create an account in GoDaddy to track all your products in the ‘my accounts’ section. You can also use your Gmail or Facebook id to login.

Once after login, click the GoDaddy button to visit home page as shown below.
As you visit the home page, shown as below, type your selected or preferred niche name in the search bar. After entering the name hit the search button.

This will direct you to the below page, where it shows that the domain name is available. In this context, always do your research for domain name and check for the availability.
You will also get premium websites in the search list. For buying premium websites you need to pay higher charges as the website is already preowned.
Coming back to domain purchase, click the ‘continue to cart’ button to proceed.

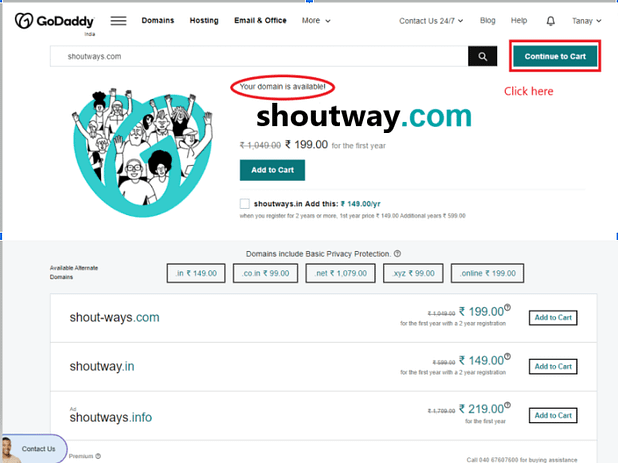
Check for availability
This will redirect you to the next page. Here by default, GoDaddy will keep the optional recommendations selected (Full domain privacy and & protection).

For your understanding, I have tried to write a brief on the optional features below,
So, What is domain privacy protection?
Domain registrars offer domain privacy through a service called WHOIS privacy protection. WHOIS privacy protection is a service to protect you from people finding your personal information in the WHOIS records.
Buying into this will hide a domain registrant’s personal information from public view to keep it private.
What is Ultimate domain protection & security?
Ultimate Domain Protection & Security is like having an online security guard. It automatically scans for malware and uses continuous security monitoring to tackle new threats.
It also monitors search engine blacklists to protect your domain reputation.
Can I add domain privacy later?
You can add domain privacy to any domain you’ve registered at any point in time. However, if you have the ability to add privacy up front, do so. If you don’t add privacy immediately, your information will be posted publicly.
So, if you can spend a little amount of extra bucks yearly, then go for the domain privacy & protection.
Or, else you can opt for it later also.
Now the best part is, there are a number of free security plugins in wordpress which you can install in your site with two clicks.
In the present case, I shall skip adding any optional feature.
So, select ‘No thanks’ option and click the ‘Continue to cart’ option as shown above. Once clicked, it will direct to the below ‘Purchase’ page.
Here just select your time frame from the drop down list. You can go for one year and for the second year you need to renew the plan with a charge.
If any additional service is selected you can unselect and proceed to check out as shown below.

There are multiple payment options in GoDaddy as shown below

You can use any of the above options. Once you pay the amount, your new domain is ready.
Congratulations!!. So, you are ready to make your own impact on the web.
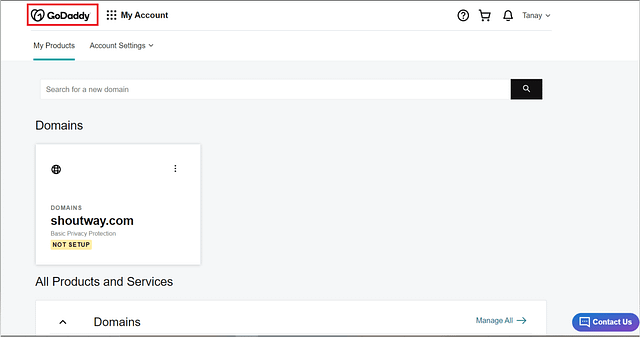
Now when you go to your GoDaddy account, your default page will look like this

You can find a word ‘DNS’ i.e. Domain Name System or Server below the ‘Manage All’ tab in your GoDaddy ‘My products’ page.
I shall tell more about DNS in the later part of the blog once the hosting is ready.
Selecting and registering hosting
Now as our domain is ready, so the next step is purchasing the web hosting service.
Web hosting is a service that hosts and stores your website files (content) on a secure server that is always up and running. Without a web host, your site will not be accessible for others to read and browse.
What server type is best for you?
Different hosting providers offer different server types. These are
- Shared Hosting. In a shared hosting plan, you will be sharing your server with other people. Shared hosting is cheaper, however, you may find that there are performance issues.
- Dedicated Hosting. Here you will have your own server dedicated to your website. You will have exclusive support, but again, this option is more expensive.
- Cloud Hosting. Some companies, offer cloud hosting, which allows for better flexibility in terms of scaling up your site reach and it works very swiftly. Prices varies depending on need.
Whichever web hosting company you sign up with, make sure it has the following minimum features:
- Free SSL for Security
- One click install for wordpress
- Custom email accounts
- Unlimited database.
- 24/7 customer support, preferably live-chat
There are many hosting companies which you can select,
For e.g. Bluehost, Siteground, Namecheap, A2 hosting, WPX hosting etc.
All the above web hosts are good. They have their own advantages and also some disadvantages. I shall discuss how to select a good hosting service in my upcoming blogs.
For shoutway.com I have gone with siteground as it includes most of the features listed above. And, It has a 30 day money back guarantee.
Now as I am done with choosing of hosting service now comes the next step,
Buying a hosting plan
So, once you get to siteground.com, below is the home page. Once you arrive at the home page, all the hosting plan options will be available.
As we are going to build a website with WordPress, So select WordPress hosting.

Once you select WordPress, it will show the various hosting plans. Siteground gives three hosting plan options which are Startup, Growbig, Gogeek.
Startup is the basic plan and it can host,
– 1 website
-Will give 10GB space
-10000 visits/month
-Free SSL
-Free WordPress installation
– Unlimited database
– Free email
– Free CDN
For more details about the above features, you can just put your cursor on the links and it will show a pop up detail.

The Growbig plan gives unlimited websites, 20 GB web space, 25000 visits/month in addition to all the features of startup plan.
Gogeek plan is mainly for bigger sites with more than 100000 visitors monthly. It gives unlimited websites, 40 GB web space in addition to the start-up plan.
If you can afford it, go for Growbig plan. You can go with start-up plan, but say after few years your site has grown bigger with higher traffic, at that point you have to again migrate to the higher plans which might be a hassle.
For my blog website, I selected the Growbig plan.
Once you click the ‘Get plan’ tab, it will navigate to the below page i.e
Step-2: choose domain option.

Here you will find two options one is ‘Register a new domain’ and the other one ‘I already have a Domain’.
As I have already got a domain name from Godaddy.com, so I shall go with the second option. Next after entering the domain name click on ‘Proceed’ button, which will take you to the next step,
‘Step-3: Review & complete’ page.

Enter all your details regarding account information as shown above.
In the ‘client information’ part, enter your name, address etc. All these are self explanatory.
Next is the Payment information part, where you have to enter credit card details. Currently, Siteground supports only credit card payment.
Once you are done with the payment details pass on to the Purchase information part, where you will see your hosting plan, period, extra services and data centre.
For shoutway.com, I have gone with the Grow big plan.
You should select the data centre cautiously, as I am living in India, I have chosen the closest one that is Singapore, Asia.
Other options are USA, Europe, Australia, Germany and the UK.
It’s a good practice to choose a data centre closer to your geographical location as the coordination in customer support will be in a timely manner.
Siteground gives you an option to buy an extra service ‘SG site scanner’, which is a monitoring service that keeps your site safe from hacks and malicious attacks.
However, there are many good WordPress plugins which you can install on your WordPress site for added security and safety. I shall write about a list of such good plugins in my upcoming blogs.
So, here we will skip the ‘Extra service’ option.
Recheck your entries once more and then click on pay now.

With successful payment, you will see the below page appearing.
Congratulations!! You have purchased your hosting plan and are just a few steps away from building a WordPress website.

Installing blogging platform (WordPress)
Once done with the payment. Click on the login tab, which is at the upper right corner of the page.
This will navigate you to the below screen. Enter your password and login into your account.

Once after log in, you will be directed to the below shown page. Here as shown click on the ‘Websites’ section.

The below page appears once after clicking the ‘website’ tab. This page, it will show your website name and hosting plan. You can click on the ‘hosting plan’ for checking your plan.
Once done, click onto the ‘New website’ tab as shown below, to start to create your website.

After you click the ‘New website’ button, it will direct you to the following page. In which there will be options of
‘Start new website’ and
‘Migrate website’.

‘Migrate website’ tab is used when you have an existing website with some other hosting plan and you want to change or migrate it to a new plan. As we are creating a new website, so, will stick to ‘Start new website’ option.
Once you selected the tab, as shown above, it will show the four applications in which you want to make your website.
As we are going to make our website in wordpress.org, so, select ‘WordPress’ as shown in the below snapshot.

After selecting the ‘WordPress’ tab, it will show a tab for filling in your installation details. Here, you have to include the setup login details, i.e. the email and password you want as your WordPress credentials.

Once done with the details, then press the ‘GENERATE’ button. Which will navigate you to the below page, and then press FINISH.

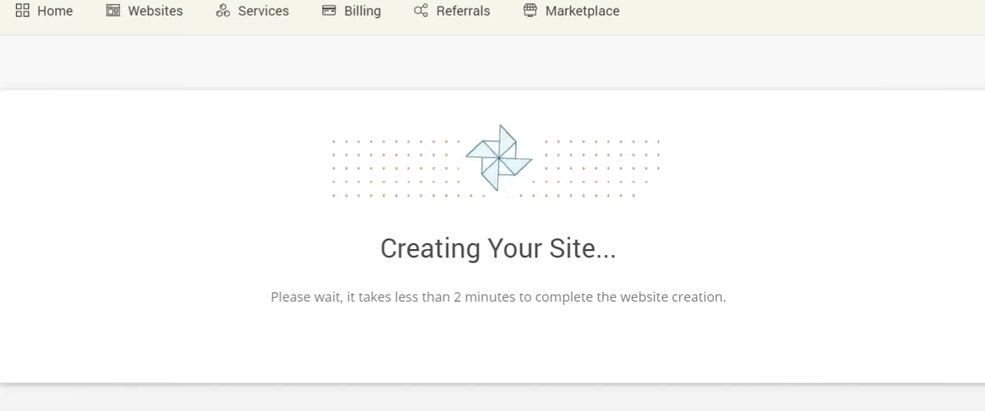
Siteground will start creating your website.
As the below page appears, it means You are all set to access the admin area.

Once you press the LOG IN ADMIN button, it will navigate to the below page, where just press EXIT to land to the WordPress dashboard.

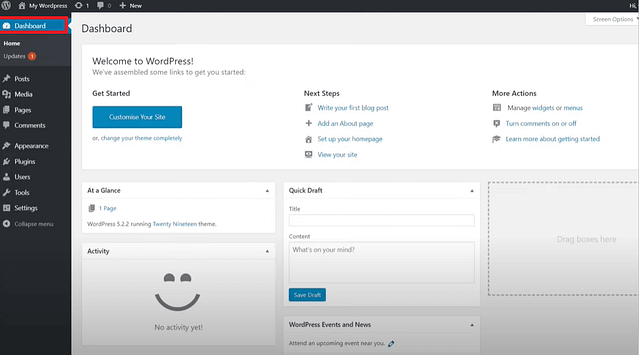
The below page shows the WordPress dashboard. This is the background of your website. All the website editing is done from here.

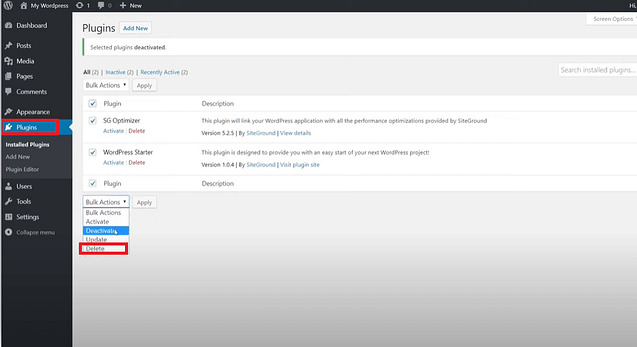
The above WordPress dashboard looks a bit different due to the default plugins ‘SG optimizer’ and ‘WordPress starter’ already installed. To navigate to the basic dashboard look, just go to the ‘Plugin’ section, select the two plugins and from the bottom dropdown tab select ‘Delete’ and apply, as shown below.

Once done, the dashboard will look like below. This is the basic WordPress dashboard look.

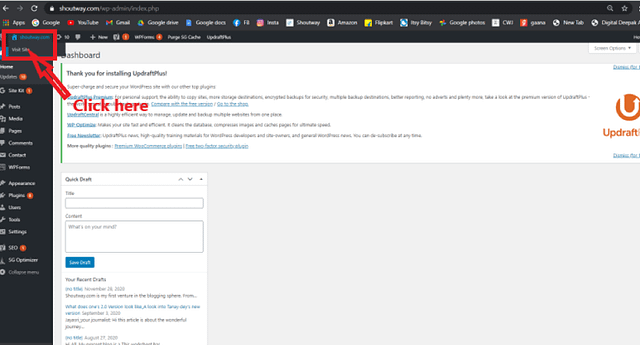
So, after doing all the work, the website is ready. Now once you take your cursor on the website name, it will show an option ‘visit site’ tab, as shown below.

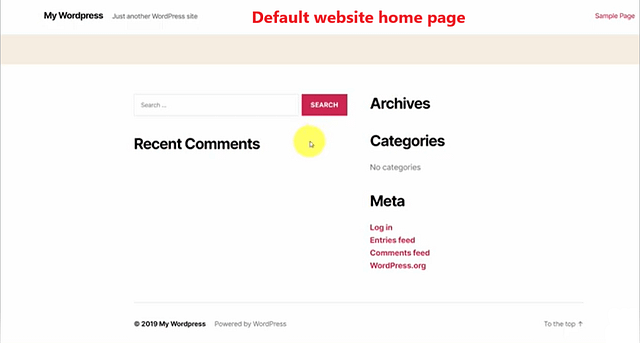
Click on that, and the default website home page will be infront of you as shown.

That’s it, the website is ready. Now to change the theme, just go to your WordPress dashboard, and then click on ‘Appearance’ and then ‘themes’. Once after clicking themes, the page will be populated with already available free themes. You can select ‘Add New’ for any other themes apart from the already available.

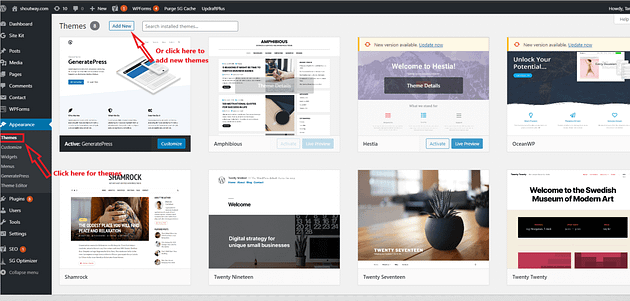
Once you select or add any theme, then just click install and then activate it. The theme will get activated. There are hundreds of free themes available in the add new section. Just go through and select as per your needs.
You can now go to the user tab, update the profile settings. Most of them are self explanatory or you can google out for more information. I shall come up with more WordPress tutorials shortly.
Some important points to create your own website
I have listed down some important points, which you should know before you start website design in WordPress.
HTTPS enforcing:
For this visit your siteground dashboard, log in to the account using your already registered credentials. After login, click on to ‘Security’ tab in the left bar, which will show a drop list, in the drop list click on ‘SSL Manager’, then click the three dots under the ‘Manage SSL’ area as shown below.
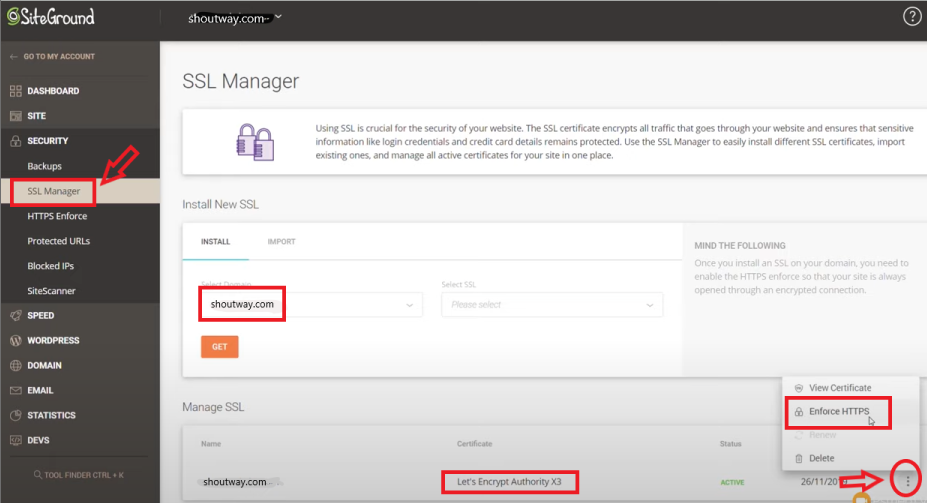
Once after clicking the three dots, it will show pop up rows, in that click
‘Enforce HTTPS’
HTTPS (Hypertext Transfer Protocol Secure) is an internet communication protocol that protects the integrity and confidentiality of data between the user’s computer and the site. It basically is a combination of HTTP + S, here ‘S’ is the added security.
Once done, you will find the locked sign (secured) indicated in the website bar, when you enter your site name, as shown below,


Thus your site gets extra secured once HTTPS is enforced. Nowadays, search engine too prefers HTTPS encrypted website to give better results to the searchers.
Basic WordPress plugins:
There are lot of free WordPress plugins available nowadays. Plugins enhance your website overall performance. However, the use of too many plugins is also not good, this is because, it reduces the page loading speed, can cause page errors etc. which hampers the site performance.
Below is a list of basic plugins that you can install in your website.
Akismet: This is a very good plugin for spam protection of your website.
All-in-one SEO/Yoast SEO/Rank Math: All these give you helps to provide the best search engine optimization of your articles. It takes care of the readability, keyword requirements, mete descriptions, inbound and outbound links. Any one of these plugins will make your SEO work much easier.
Mashshare: A free Social Media Plugin, the professional and highly customizable
ecosystem for social media sharing and optimizing of your valuable content.
W3 Total Cache / W3 Super Cache / WP Rocket: This plugin improves the user experience of your site by improving your server performance, caching every aspect of your site, reducing the download time and providing transparent content delivery network (CDN) integration.
Site Kit / Exact metrics: This plugin provides users with an easy solution for the integration and management of Google’s website performance and analytic tools from a centralized location in the WordPress dashboard.
Updraft Plus: This is one of the best WordPress backup plugins. It allows you to set up automatic backup schedules. It will also help you restore your WordPress site in case something bad happens.
You are good to start your website with the above plugins. All these are free to use, however, they have premium versions also with additional features, but the free version covers most of them.
How to use WordPress for login?
To access the WordPress dashboard you simply need to add /wp-admin at the end of the URL where you installed WordPress. For example,
www.shoutway.com/wp-admin
Once I enter the above URL, the below screen appears,


It asks for login credentials, and once entered I can access the dashboard area.
DNS configuration for website:
DNS stands for Domain Name System or Server. The main function of DNS is to translate domain names into IP Addresses, which computers can understand. It also provides a list of mail servers that accept Emails for each domain name.
Now, say if you are buying your domain and hosting from the same service provider, then you don’t have to do anything. That means, no additional setting needs to be done. Say, you purchased your domain and hosting services both from Bluehost, then the DNS update is done automatically.

However, If your domain and hosting providers are different, then the DNS update needs to be done manually.
I shall cover this point in my upcoming blogs regarding manual DNS updates, as including the steps here will make the present blog bit complicated.
For getting an overview on the same, you can go through this article.
Conclusion
In this blog, I have shown you how I have created my first blogging website stepwise. Nowadays, WordPress acts as a great platform for creating a website. You don’t have to know to code, there are lots of free and premium plugins which make it very easy to build a website in WordPress.
Building a website is the first step to mark your presence on the web. Once your site is ready, you can write some articles publish those and can share the same on your social media. For higher reach, you can start social media and search engine marketing.
Try to do some basic SEO within the articles and most importantly be consistent and committed. And within a few months, you can see that your hard and smart work started to show results and in the course of time it will be bigger and better.
So, do you find the article useful? Do share your comments and suggestions in the comment box below. I shall love to get your feedback and suggestions to improve my content.
And if you find the article useful, don’t forget to share in your social feeds.
Purchase a domain, get hosting and
Bang!! Create your own website
That’s it..
Happy reading!!
Tanay?


